Sasilvia Cheong Pei Hoong / 0345031 / Bachelors of Design in Creative Media
Information Design
Final Project
Lectures
Week 1- What is Motion Graphics?
Motion graphics is graphics in movement which is composition + animation.
Composition= Graphics + Typography
Animation= Movement + Rhythm
The steps in creating a motion graphic:
Step 1: Write a Script That Tells a Story
Step 2: Storyboard While You Brainstorm the Visual Treatment
Step 3: Take Your Storyboards into Design
Step 4: Animate the Final Designs
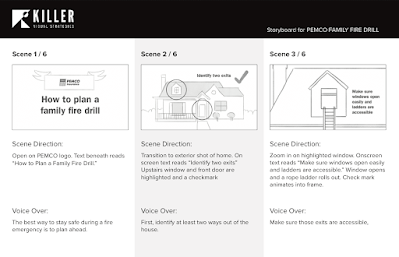
Storyboard for motion graphics is to sequence of sketches provide visual reference for key scenes.
Fig. 1.1 Storyboard
Previsualization: Create a visual script then breakdown the scenes and running times.
Fig. 1.2 Visual script
Create a mood board to organize inspiration and references.
Fig. 1.3 Mood board
Week 4: Vector/ Character Animation
Create graphics in AI
Select layers intend to animate
Place them on separate layers
Vector animation in AI
Artboard resolution: 1920x1080
Separate subjects in different layers
Import to AE
Import as composition
Layers separate for animation
Basic transform properties:
Position, Scale and Rotation
Advanced:
Vector animation: Bounce Effect
Character animation: Wiggle, Puppet position pin tool
INSTRUCTIONS
Week 1: Individual Task
We were tasked to recommend 3 professional motion graphic videos and write down our own rationale of why did we pick these specific videos.
It took me quite some time to find ones that I like and these are the ones I picked below:
Fig. 1.1 CHAI, Infographics Motion Graphics
In the first motion graphic video, the first thing that caught my eye was definitely the art style used it is very vibrant and unique. One of my favorite thing throughout the video is the moving of the dots which create motion that plays a huge part in making everything in the video come to life. From placing onto the human characters for highlights, around the candlelight to create a sense of light lighting up, making some elements to feel for 3D and so on. The multiple patterns used is a great idea to make things feel more realistic. Other than that the transition and movements are very smooth which makes watching it worthwhile.
Fig. 1.2 Imposter Syndrome Trailer
For the second motion graphic video I really like the part where the two hand opens up a building and shows a crazy fever dream like world and then proceeds to show two human going crazy and flashing on and off while transitioning to the part where the hand spreads out a deck of cards. This motion graphics video is really well made and captures the aspect of people with imposter syndrome. Everything about this video from the colours, elements and transition used are all perfect. It makes the viewers feel like they are getting an adrenaline rush and overall have fun watching it.
Fig. 1.3 Bauhaus
Last but not least, I found this video to be simple yet captivating to watch. I like how they utilized the shapes, lines and colour to create different movements and patterns. Each lines and shape slides in the beginning where it goes from fast then slower following the music used. The part where multiple circles in different colours are made into a patterns tricks the brain where it spins and create into another pattern instead like a never ending thing. My favorite part is where there are multiple black dots and the colour ones slowly pops up one by one according to the rhythm of the music. It shows that even with simple elements just by adjusting the shapes, thickness and colour it will create a whole new thing.
Week 4 Task: Individual- Practice Vector/ Character Animation
On week 4 Mr. Martin has given us a practice on character animation. Where we are given either the option A,B,C or D and I was given with A where I had to separate the layers of the given illustration that I want to animate in Illustrator and then export the file to After Effects to animate it.
Fig. 2.1 Given Illustration (25/1/2022)
Fig. 2.2 Changing artboard size to 1920x1080 (30/1/2022)
Fig. 2.3 Separating layers (30/1/2022)
Before I import the file to After Effects I changed the artboard size to 1920x1080 in Illustrator then continue with separating the layers that I want to animate. Layers I decided to animate are the legs, head, text, text box, cat tail, body, coffee, the 3 leaves on the left side of the illustration and the bubble looking background.
Fig. 2.4 Animating the text (2/2/2022)
For the text animation I had to delete the one that was in Illustrator before and create a new one so that I can do a typewriting style animation. After typing out my words I click onto the animate button on the left side of the text option and use character offset. I then go to animator 1 and click add opacity where I adjust the opacity then after that adjust the smoothness.
Fig. 2.5 Animating coffee vapor (2/2/2022)
For the coffee vapor animation and the bubble in the background I used the wave warp effect which gives me a liquid and flowy type effect. Other than that all the other animations were done with adjusting the anchor point, position, scale, rotation and opacity.
Fig. 2.6 Final character animation (3/2/2022)
Group Task: Final Project
For our final project we were required to work in groups and the topic
we were given is Sex Education 101. Where we have to research and
condense the given script and develop a suitable visual narrative
to deliver an awareness motion graphic. Our target audience should be
considered as the general public.
The first thing my group did was going through the script given and
selecting the chapter that we were going for. We all did a
voting and picked the first one which is "Your Body".
Identifying Sensitive Information
We all agreed on having our discussion on Wednesday on discord on
identifying the sensitive information in the script given. We all wrote
what will be suitable and not too graphical to look at.
Fig. 3.1 Identifying Sensitive Information (5/1/2022)
After that we move over to google slides to prepare for our presentation
on Thursday.
We discuss about:
Basic Roles
Agreements & Consequences / Ground Rules
What we consider sensitive information & alternatives to
present it
Giving out specific work tasks
Storyboard ideas
We separated the script into three parts which is:
Welcome and introduction, puberty, reproductive system (Adena and
Adeline)
Menstruation (Diane and Alicia)
Pregnancy (Me and Yi Ki)
Fig. 3.2 Presentation slide (5/1/2022)
Mood board
After showing Mr. Martin our presentation slides we were task with
creating the mood board. Since we discuss beforehand that we wanted to
have a no gender narrator, Adena came up with the idea of having our
narrator to be in a pyramid looking shape so I remembered that
there was one character in a show called "Gravity Falls" named Bill
Cipher and he was a yellow looking pyramid with limbs.
Fig. 3.3 Bill Cipher from Gravity Falls (6/1/2022)
On our next meeting we went to google docs and pasted reference
pictures as well with their links. We also discuss on the art style
and colour palette that we were going for.
Fig. 3.4 Reference pictures links (8/1/2022)
Fig. 3.5 Final Mood board (8/1/2022)
Final script breakdown We had a
group discussion on the final script breakdown and split the work to the
parts that we were in charge of in the storyboard. We breakdown the script
according to the scene, highlighted the keywords in the script breakdown,
wrote a description of how the storyboard visuals look like, added the
running time as well as the estimated duration of each scene.
Fig. 3.6 Final script breakdown (19/1/2022)
Storyboard
For storyboard we divided the work, me and Yi Ki was in charge of the
pregnancy part so We decided to split the work where I do frame 14, 15
and 16. After we were done we has a group meeting to look at each
other's outcomes and gave opinions of what is nice and what should be
changed.
Fig. 3.7 Storyboard frames 14,15,16 (25/1/2022)
We had a feedback meeting with Mr. Martin where he looked at our
storyboards and final script breakdown.
Animatics
We then proceeded to do the animatics according to the parts we were
divided to and combine them together later on. For my part I added arrows to
indicate the direction of the animation and I improved two scenes which is
the doctor one and also the you won't get your period one.
Fig. 3.8 Animatics for frame 14,15 and 16 (4/2/2022)
Final Animatics
After we were done with our parts, Alicia combined all of our animatics and
send it over to Mr. Martin for feedback. Mr. Martin said that he will look
over the animatics with us tomorrow, in the meantime proceed to the next
stage, what is a more efficient way to work on the style frame
illustration.
Fig. 3.9 Final Animatics (7/2/2022)
We separated our works for the final video by sketching, line art,
colouring, animating and editing. Since we needed a consistent art style I
decided to take the role of sketching and improving the whole storyboard
before it goes to line art. The other person will start their part of their
work once the one before them finishes a frame.
Roles divided:
Sketching- Me
Line art- Diane and Adena
Colouring- Alicia and Adena
Animation- Yi Ki and Adeline
Editing- Adena and Alicia
Approximate time given for each part:
Sketch - 3 days
Line art - 3 days
Colouring- 3 days (or 2 days)
Animation - 4 days (or 5 days)
Editing- 1 day
Sketches
After we finished our animatics, I immediately started my part which is sketching the scenes out as I have to get my part done before others can proceed. I had to redraw all the frames in a consistent art style and also improve some parts that we think that is lacking. Like there are some blanks at certain scenes so I added a few more frames to cover up the space and some scenes that felt the need of the narrator was also added in.
Fig. 3.13 Fina sex education motion graphic video (22/2/2022)
FEEDBACK
Week 4 (25/1/2022)
The visuals and character ideas can come easily and our target
audience is female so it is a bit confusing that you are using a no
gender narrator. How do you want the tone to be presented. Make sure
to take note on the consistency of art directions, rely on mood board
and art directions references. There is no need to worry about being
explicit. Plan about the movement using arrows do not have to be
complicated. For the scene where the boy gets his first ejaculation do
not have to be milk. Frame 2-6 can be zoom out. Split things are
usually for comparing, for same things just zoom in. The need of
emotion is important so that the visuals will mean something to us.
The info and visuals are presented but something is missing, maybe
something from a pov rather than neutral. The speed of some scenes
might be too fast, do the animatics so that we will know the flow. For
frame 15 the doctor scene is a bit confusing maybe change the visuals.
Yi Ki's frame 13 version two is more fun go with that. Other than that
it looks nice.
Week 6 (8.2.2022)
The flow part done by me is promising, if this is how it works the
final outcome will be good. Very clear in visual and animation, assign
her as illustrator. As soon as the illustrations are done animators can
continue their work. We told Mr. Martin about the roles that we divided
among each other and he said that we a planning very well and good
job.
Week 7 (17.2.2022)
So far everything looks great, do consider adding sound effects. Colours looks a bit washed out in different parts. Animation at 1:55 can start slow and proceed to be fast. The scene with the hand pointing is a bit distracting. The narrator does not have to come back all the time since it will be distracting. If you want to emphasize the narrator, use words or bounce effects. Adding caption will help at 2:16. AE can run from numbers 1-28 it can go longer or shorter. Why does the background at 2;21 move horizontally slightly. At 3:16, a clock used to describe months does not really makes sense, maybe can use back the calendar from the previous frames.
REFLECTION
The exercise that Mr. Martin gave certainly gave me some knowledge on how to animate in AE. The first time when I heard that we had to do a project on sex education was a bit of a shock to me since it was something sensitive and people do not really talk about it in Malaysia. Also having to do this in my house was terrifying as I grew up in a conservative household so having to draw any of my parts of the project took me some courage to do but I found a way to just do it when everyone is asleep at night so no one will question me :'). Sex education should be brought up more often and normalized as it is a common knowledge that everyone after a certain age should be educated about. As for my part of the project I had to redraw all the frames so that the art style is consistent, it did not take up much time to do but my wrist certainly died afterwards from too much drawing. I am very happy of our final motion graphic video. My group members were all so kind and helpful throughout the whole project.
28/3/2022 - 1 /5/2022 (Week 1 - Week 6) Sasilvia Cheong Pei Hoong / 0345031 / Bachelors of Design in Creative Media Advanced Typography Task 1 : Exercises LECTURES WEEK 1 Introduction and Briefing Mr. Vinod started the class by introducing us to the Facebook page so that we will be able to navigate thing better. He showed us the lecture playlist where we are able to watch all of our lectures from and take lecture notes. We are also required top refresh our Adobe InDesign knowledge as we will be using it for our first task. The eBooks can be found in the files section, Download Typographic System book by Kimberly Elam and read. Mr. Vinod gave us a short brief on our MIB. We are also required to fill up our info into the feedback sheet. Then we watched the lecture 1 video on typography system together. Lecture 1: Typography Systems Typogra...
1/4/2022 - 1 /7/2022 (Week 1 - Week 14) Sasilvia Cheong Pei Hoong / 0345031 / Bachelors of Design in Creative Media Video and Sound Production Exercises LECTURES WEEK 1 / Module Briefing Time base project- learning objectives Pre-production: Preparation Idea development Story Storyboard Visual References Location/ Props Production: Principal Shooting Lighting Costume Principal Shooting Post Production: Editing Offline Editing Online Editing Audio Editing WEEK 2 / Framing and Storyboard Shot Size Shot size determines how large the area that's visible within the frame Wide shot - W.S Includes the entire subject and important objects in the immediate surroundings Medium shot - M.S Shows the subject ...
8 /6/2023 - 25/6/2022 ( Week 10- Week 12 ) Sasilvia Cheong Pei Hoong / 0345031 / Bachelors of Design in Creative Media Environment Design / Entertainment Design Project 2: Interior and Set Design INSTRUCTION Tasks Week 10- Start sketching the thumbnail sketches for the interior. Only have to come up with one interior. Interior and Set Design Week 11 - Thumbnail Sketches ...


Comments
Post a Comment