Digital Photography and Imaging: Final Project - Self-Tilted
Get link
Facebook
X
Pinterest
Email
Other Apps
WEEK 10-14: (26/10/2021-23/11/2021)
NAME: Sasilvia Cheong Pei Hoong
I.D: 0345031
COURSE: Bachelors of Design in Creative Media
Digital Photography & Imaging
Final Project: Self-Tilted
LECTURES
Week 9 - Digital Surrealism
Realism vs Surrealism
Realism
Takes subject matters of the ordinary and common world which we call
"reality". It almost always takes non-exotic and non-extraordinary subject
matter and theme.
Surrealism
It explores the subconscious mind, with subject matters concentrating on
dream-images and often aims to distort the ordinary and what we call
reality.
What is digital surrealism?
Surrealism is a cultural movement focused on type of arts to express
about the artist's idea themselves.
Week 10 - Intro to After Effects
Adobe After Effects is a 2.5D animation programme used for compositing, visual effects, and animation. It is a video editing programme that is used in the production of movies, television shows, and web videos. This software is used in the post-production phase and has hundreds of effects for manipulating images. This allows you to mix video and image layers in the same scene.
When it comes to producing movement, Adobe After Effects takes a unique approach. Motion graphics animation creates and tells a story by manipulating vector and rasterized art. Photographs and videos can also be used to incorporate physical media.
TASKS
INSTRUCTIONS
Part 1: Idea Development (Week 10)
1. Write a biography about yourself
Tell us about yourself
My name is Sasilvia and I am half Malaysian half Thai. I have a hard time expressing my feelings through words so I often show them through my artworks or listening to songs that perfectly expresses how I feel.
What is your passion?
I value alone time and freedom where I spend it doing the things I love like watching animes, reading manga, listening to music, playing genshin impact and drawing.
What’s motivate you to achieve your dream?
The motivation to achieve my dream is knowing that I will be ending up doing what I strive to do .
How do you want to visualize your dream into an artwork?
I want to include elements I like hands, eyes, elements I like while making it twisted and dark.
2. Write a statement about your work
Tell us about your workI would like to create a dark and vintage theme poster with .an oil painting texture
What is the concept behind it?
I have a hard time telling people how I feel through words so I want to show what I am feeling, what is going through my head through my work.
What is the message you want people to understand it?
That there is no need to be afraid of expressing your feelings or what others think, being afraid and hiding it deep down will just lead you to more suffering. Try to find the beauty in it.
What is your motto/ quote?
There is beauty in everything, even in silence and darkness.
Mood board
To start off the project, I went hunting for surrealism photos on
Pinterest which will be put on my mood board as inspiration for my
poster. Since I wanted to go for a dark theme these posters caught my
attention.
Fig. 1.1-1.3 Mood board
Part 2: Design Direction (Week 11)
Sketches
Fig. 2.1 First sketch
For my first sketch I drew to hands wearing chains behind me to act as
a throne that is trying to hold myself back. I also added a crescent
moon and dark cloudy sky as I love the night sky. Tears can be seen
flowing down my eyes showing that all the pain and suffering that I am
trying to hold back is leaking out.
Fig. 2.2 Second sketch
This sketch shows two hand blocking my face that represent myself
trying to hide my emotions. The chains above me area restrains and the
flowers represent beauty. But after that I decided to change my mind
and replace the flowers with eyes to keep that dark theme I want and
the eyes represents people looking and judging me.
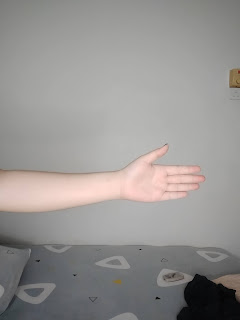
Photos Taken:
I started taking pictures of my self portrait, hands and also
chains.
Fig. 2.3 & 2.4 Self-portrait and a crop of my eye
Fig. 2.5 & 2.6 Hands
Fig. 2.7 Chains
The photo of the chains were a bit harder to take as they keep
saying and it was also hard for me to mask it in photoshop as the
chains were too tiny, so I decided to search up on images of chains
instead as the pictures area clearer and bigger.
Additional images:
Extra images that I took from the internet.
Fig. 2.8 Chains image from the internet
Fig. 2.9 An old script
Fig. 2.10 Cloud
Fig. 2.11 Milky way
Poster digitalization:
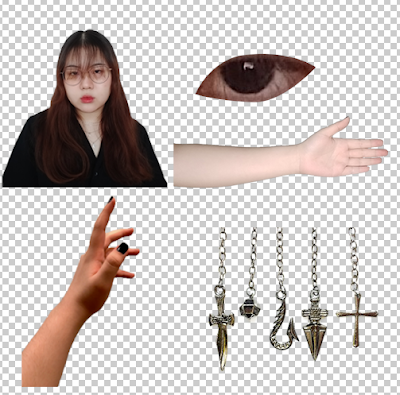
Fig. 2.12 Photos without background
Before proceeding with the alignment for the poster, I did a quick selection of the subjects
I want and mask them.
Fig. 2.13 & 2.14 Digital posters
I digitalized to different poster and got feedback from Mr. Martin.
After a quick discussion we went with the first one. He also said to
not use too much noise on my self portrait as it looked low
quality, he also said to brighten the colours of the eye and readjust
the colours for the hands to suit the poster. He mentioned that the
paper at the back looks out of place. Other than that he said maybe
applying a purple colour background will be better, he also suggested
to make the chains sway when I do the animation.
Part 3: Execution and Post Production (Week 12)
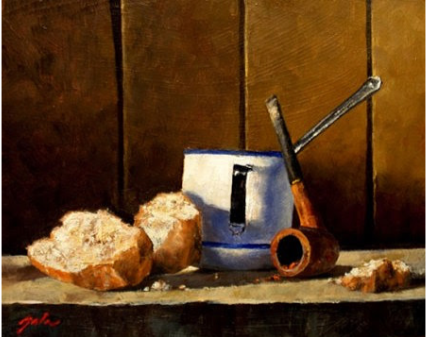
Fig. 3.1 Final poster
For my final poster, I changed the background colour to purple
as suggested by Mr. Martin. I also matched the colours of the
eyes and hands with a purple grayish tone so that my
self-portrait will stand out more. For the final touch I
added a paper texture plus a little bit noise to achieve
the vintage oil painting look that I am going for. Big thanks to
Mr. Martin for sending me various YouTube tutorials on how I
should achieve the texture I wanted.
Fig. 3.2 Final poster layers in photoshop
Part 3: Animation and Finishing (Week 13)
After I finished with my final poster in photoshop I then move on to
after effects to animate it. The elements I wanted to animate was the
eyes falling and fading, hands covering my face and chains swaying
slightly.
Fig. 3.3 Animating in After Effects
Fig. 3.4 Hand animation
For the hand animation I moved the left and right position of the
hand to make it look like it is slowly coming in the cover the face
and then looping it back to the hand going back to the original
position.
Fig. 3.5 Fading eyes animation
I only adjusted the opacity for the fading eyes, to make it slowly
fade in and fade out.
Fig. 3.6 Falling eyes animation
There area a total of 13 eyes falling where I adjusted the
position of the eyes, other than that only two of the eyes at
the bottom are additionally animated with rotation to make it
look like it has weight when it fell onto the pile of eyes.
Fig. 3.7 Chain animation
For the chains I used the cc bend it to make the chains sway.
Fig. 3.8 Poster animation
After I am done with the animation in After Effects I exported my
file and it was a total of 2.6GB since the file I exported was an
animation file. Since, I did not know how to use the quicktime app
to compress my file I used media encoder instead and used h.264
format, match source-high bitrate and my file drastically went to
18.4MB.
Right after that I went straight to Premiere Pro to add my music
choice which was Lacrimosa by Mozart.
Fig. 3.19 Music choice
Fig. 3.10 Adding music
Final Outcome
Fig. 4.1 Final poster JPEG
Fig. 4.2 Final poster animation
Title: Desire
Artist Statement:
My final outcome of my poster might be a bit dark but this perfectly
represents the concept that I am going for. I want people to know that
“There is beauty in everything, even in silence and darkness”.
The eyes falling and piling up represent my fear and anxiety of
people constantly staring at me as if they are judging and looking
down on me. The two eyes above my head slowly disappearing and the two
hands covering my face shows that every time I get stares from people
I just want to disappear and be alone at that moment. The chains on
the top represents me having to lock up my own emotions as I have a
hard time explaining them to people and might sometimes lead to
certain awkward situations.
But through all these negative emotions I have where I keep myself in
silence and darkness, I feel peaceful and calm, I want to find the
beauty in it, I want to achieve this desire to find my true emotions
and maybe one day actually tell people how I feel.
FEEDBACK
Week 12 (8/11/2021) - Mr. Fauzi
The idea looks great but try to go for a more positive theme since other
people looking at you work will be thinking "Is this what you are doing at
University?".
Week 13 (15/11/2021) - Mr. Martin
Any design you want to go for is okay, it does not matter if your going
for a negative or positive theme as long that it is what you want then it
will be fine.
Week 14 (22/11/2021)- Mr. Martin
Go with the first digitalization . The
self-portrait looks low quality try not to use noise on it.
The eyes area a bit dark so try to adjust the brightness, also
try to adjust the colours of the hand to suit the poster more.
The paper behind your self-portrait looks out of place
maybe can remove it and change the background colour (maybe
purple) so that it does not blend with your black shirt too
much. Addition to that, try to make the chains
sway slightly for the animation.
REFLECTION
When I first started this project I struggled so much with writing my
biography as some questions were a bit too hard for me to answer and I
ended up taking 2 whole weeks to come up with a final decision. After
showing Mr. Fauzi my biography and sketches, he told me that it was a bit
too dark and negative, maybe try going for a more positive theme as people
will be looking at my work and be thinking why did I pick such a dark
topic for. I was super stuck after that and did not know what to do since
I already fully decided on what I want and most of the time I love doing
dark themed works as it expresses the other side of someone, not
everything should be bright and happy sometimes having a bit darkness in
your life is beautiful in a way.
But the following week, Mr. Martin gave me feedback and said any theme is
fine as long as it is what you want. I want to say thank you to Mr. Martin
for being supportive with my idea! Since a lot of time was used
up on writing my biography and sketches, I was a bit worried
that I would not be able to finish my poster within the time I have
left, but thankfully after some intense time management and grinding I got
it done. The poster editing part took way longer than I expected, but
thankfully I did not face any difficulties with the animating part
which saved me time. I am pretty satisfied with my outcome as it goes very
well with the theme and music choice I went for.
28/3/2022 - 1 /5/2022 (Week 1 - Week 6) Sasilvia Cheong Pei Hoong / 0345031 / Bachelors of Design in Creative Media Advanced Typography Task 1 : Exercises LECTURES WEEK 1 Introduction and Briefing Mr. Vinod started the class by introducing us to the Facebook page so that we will be able to navigate thing better. He showed us the lecture playlist where we are able to watch all of our lectures from and take lecture notes. We are also required top refresh our Adobe InDesign knowledge as we will be using it for our first task. The eBooks can be found in the files section, Download Typographic System book by Kimberly Elam and read. Mr. Vinod gave us a short brief on our MIB. We are also required to fill up our info into the feedback sheet. Then we watched the lecture 1 video on typography system together. Lecture 1: Typography Systems Typogra...
8 /6/2023 - 25/6/2022 ( Week 10- Week 12 ) Sasilvia Cheong Pei Hoong / 0345031 / Bachelors of Design in Creative Media Environment Design / Entertainment Design Project 2: Interior and Set Design INSTRUCTION Tasks Week 10- Start sketching the thumbnail sketches for the interior. Only have to come up with one interior. Interior and Set Design Week 11 - Thumbnail Sketches ...
1/4/2022 - 1 /7/2022 (Week 1 - Week 14) Sasilvia Cheong Pei Hoong / 0345031 / Bachelors of Design in Creative Media Video and Sound Production Exercises LECTURES WEEK 1 / Module Briefing Time base project- learning objectives Pre-production: Preparation Idea development Story Storyboard Visual References Location/ Props Production: Principal Shooting Lighting Costume Principal Shooting Post Production: Editing Offline Editing Online Editing Audio Editing WEEK 2 / Framing and Storyboard Shot Size Shot size determines how large the area that's visible within the frame Wide shot - W.S Includes the entire subject and important objects in the immediate surroundings Medium shot - M.S Shows the subject ...


Comments
Post a Comment