Anatomy and Character Sculpture - Exercises: Fundamentals of Anatomy and Digital Sculpting
1/9/2022 - 11/11/2022 ( Week 1- Week 11 )
Sasilvia Cheong Pei Hoong / 0345031 / Bachelors of Design in Creative Media
Anatomy and Character Sculpture / Entertainment Design
Exercises: Fundamentals of Anatomy and Digital Sculpting
INSTRUCTION
Tasks
Week 1:
1. Search and saved references for the head and poses.
2. Practice with shapes on both human and stylized
characters.
3. Download Zbrush
Week 2:
1. Collect skull and skeleton references.
2. Do skull and skeleton studies
3. Practice sculpting a head on Zbrush.
Week 3:
1. Identify and simplify the shapes and block out for skeleton studies.
2. Sculpt head till neck in Zbrush
3. Head sculpt part 2
4. Sculpt bust
5. Simple body sculpture
Week 4:
1. Sketch- Identify the torso muscles, not too detailed just a
simple understanding of it, like the movement, twisting and stretching
with the soft/ solid muscles, fat tendons, etc.....
2. 3D Model- Sculpt a skeleton, if have time sculpt the muscles
around it as well.
Week 5:
1. 3D Model- Sculpt a skeleton, if have time sculpt the muscles
around it as well. Build muscle - screenshot then label. - builds out
the head bust, build in detail, hair also need.
Exercises
Anatomy
Week 1
In week 1, we were tasked to search images references for head and body poses. Then we had to do the studies by blocking and shaping the structure out in a simplified form.

Fig. 1.1 Head week 1 (9/9/2022)

Fig. 1.2 Posture #1 week 1 (9/9/2022)

Fig. 1.3 Posture #2 week 1 (9/9/2022)

Fig. 1.4 Posture #3 week 1 (9/9/2022)
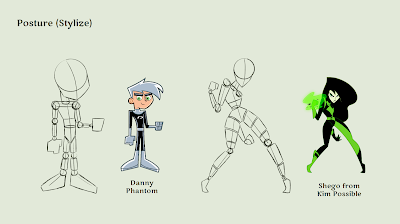
Fig. 1.5 Posture stylize week 1 (9/9/2022)
Week 2
We did skull and skeleton studies in week 2.

Fig. 1.6 Skull #1 week 2 (14/9/2022)

Fig. 1.7 Skull #2 week 2 (14/9/2022)

Fig. 1.8 Skeleton #1 week 2 (14/9/2022)
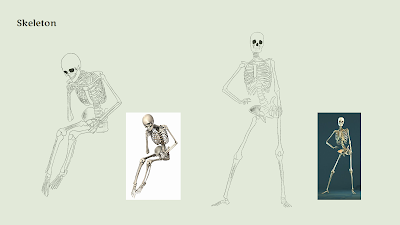
Fig. 1.9 Skeleton #2 week 2 (14/9/2022)
Week 3
Through the feedback I got from Mr. Kannan I was told to not go into detail and simplify the skeleton structure instead and make sure to label to motion out like how each joint twists.

Fig. 1.10 Skeleton simplified #1 week 3 (22/9/2022)

Fig. 1.11 Skeleton studies simplified #2 week 3 (22/9/2022)
Week 4
In week 4, we had to do perspective and lighting studies, 2D plane study on torso to understand how the body twist and moves, and torso muscle studies.

Fig. 1.12 Perspective and lighting week 4 (28/9/2022)

Fig. 1.13 2D Plane, torso week 4 (28/9/2022)

Fig. 1.14 Back torso muscle week 4 (28/9/2022)

Fig. 1.15 Front torso muscle week 4 (28/9/2022)
Week 5
We were tasked to study and breakdown the structure of hands and feet.

Fig. 1.16 Hand week 5 (12/10/2022)

Fig. 1.17 Feet week 5 (12/10/2022)
Sculpting
Week 3
In week 3 we started learning how to use ZBrush. Our first ZBrush task was to do a head and chest sculpt and also do a body build up sculpt.

Fig. 2.1 Head and chest sculpt week 3 (22/9/2022)

Fig. 2.2 Body build up week 3 (7/10/2022)
We were taught about ZSphere in class and how it would be useful when it comes to posing the characters.

Fig. 2.3 ZSphere body week 3 (7/10/2022)
Week 4
We were then tasked to sculpt a simplified skeleton structure in week 4.

Fig. 2.4 Skeleton week 4 (28/9/2022)
Week 5
In week 5, we had to continue from the skeleton structure we did previously and add on the muscle block out.
.png)
Fig. 2.5 Muscle block out week 5 (5/10/2022)
Final
Fig. 3.1 Exercises: Fundamentals of Anatomy and Digital Sculpting
(11/11/2022)
FEEDBACK
Week 6 (6/10/2022)
Sketches: In the head studies, reduce the visibility of the eye curve, and greyscale
it to give it some shadows so that it looks much more solid. For the
posture, breaking the heel, base, and toes will give a better understanding
of how the parts are. Week 4, perspective and lighting, the chest has to be
centered, give the back a bit of a curve.
3D Model: Good start with the head sculpt in week 3. For the muscle block out proportion hands are too small, the tip of the finger
should sway in and creates an arch, and the arms are too straight give it
some curve. The hands should be facing outwards not bent in. Give some bumps
on the legs. Make sure to get the pelvis right first before doing the bump
on the stomach, the stomach should be a bean shape. Push the neck up a bit
so that it is not too straight. Before getting into the details look at the
big picture first. Always focus on the balance of the character so that it
does not look like it will tip over.
REFLECTION
Doing the anatomy studies helped me learn that going into details, always block the structure out first in order to get the proportion right. I had always just went straight into details which normally ends with me having to redraw certain parts of the body again since the proportion were off. However, it was sometimes tiring having to constantly draw so much while having so many other assignments to do as well. But I found the blocking method extremely useful and will utilize it when I draw characters in the future. I was actually a bit hesitant when we had to do 3D modelling since this was only my second time doing it, first was during foundation in design. It is a bit scary having to learn a new software from the start in such a short amount of time. Looking at the exercises I did, there is still so much more I need to improve and I will try my best at it.


Comments
Post a Comment